
One of my favorite movie genres is film noir. The term "film noir" is french for "black film". Typically, film noir is characterized as a gritty early Hollywood crime drama. Most of these types of films were shot between the early 1940's and late 1950's with a few popping up here and there even into this millennium.
Film noir had it's own type of lighting, most of which was typified by hard lighting and low-key settings. Often the director used shadows to create shapes in the background or sometimes even on the actors. A familiar one being a streetlight shining through the venetian blinds of a private eye's office.
Although, film noir is a cinematic technique, this type of lighting is quite easily done in still photography. You can achieve fantastic results using as little as one light or more if you have them. I find that using one light on the subject with a reflector to bounce a small amount of light to bring out some details in the shadow areas works great.
The great thing about film noir lighting is the delicate interplay between the light and shadow which can add an air of mystery or even glamour to your subject.
When shooting a film noir type of subject most people opt to go the black and white route. Although you can use this type of lighting in color, black and white gives the images a nostalgic feel and this is the most typical way to go. When shooting portraits I usually shoot in RAW mode. When shooting film noir portraits I still shoot RAW, but I change the Optimize Image (D200 and D60) or the Picture Control (D300) to monochrome. Although the RAW image is recorded in full color the preview on the LCD shows in black and white. This gives you a better idea on how your image will eventually turn out after post-processing. Obviously, you can also shoot JPEG in monochrome to save yourself some time. I've done it this way as well with great results.
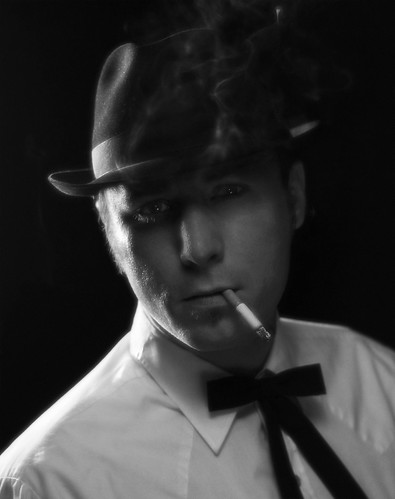
For the first example I used a very simple one light setup. Behind the subject (which was me) I placed a 200 ws Smith-Victor monolight. Attached to the light was a shoot-through umbrella. Although I wanted a very hard light source using an umbrella allowed me to soften it a bit and add some directionality to the light. The light was set at 1/4 power and the camera was set to 1/250 @ f/1.8
One thing to remember is that the closer the light source is to the subject the softer the lighting is. Even with a modifier such as an umbrella, which is supposed to soften the light, placing the light further away allows you to get a rather hard light source. In this example the light was placed about 10 feet away just out of sight of the camera.
As is, this simple one light setup gave me a nice rim light that highlighted the side of my face and shoulder giving nice separation from the background, but the rest of my face was in deep shadows and lacked any details. To add some detail to the shadow area I set up a light stand and clamped a reflector to it which bounced some light into the shadow area adding some much needed detail.
Incidentally, this photo was featured in the Photo Workshop series book Photos That Inspire.
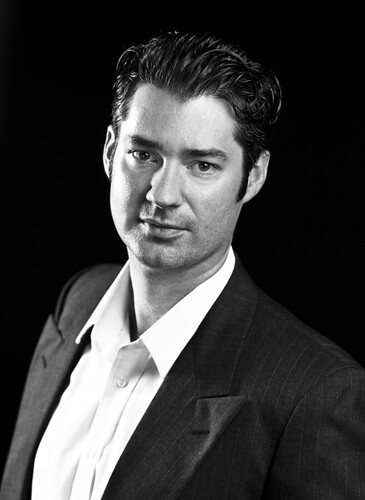
For this actor's headshot I used a two mono-light set-up. Although this is a film noir style portrait, I needed a softer light source to show more detail in the face. Similar to the previous example I set up a rim light about 10 feet behind the subject at camera left set to 1/4 power. For a modifier I used a small 24" X 32" softbox. For the key or main light I used a larger 36" X 48" softbox and set the light about 3 feet from the subject just to the right of the camera set to 1/16 power.
Apart from the lighting, another technique I employed here was the use of a dutch angle. A dutch angle, also known as an oblique shot in cinematography, involves the tilting of the camera so that is not straight with the horizon. In this shot it gives the appearance that the subject is leaning back, adding some tension and interest to the image. In actuality the subject was standing straight up and shooting the picture normally would have given the image a rather static business-like quality. Photographer George Hurrell used this technique quite a bit in his Hollywood portraits of the stars of the 30's and 40's and well into the 90's.
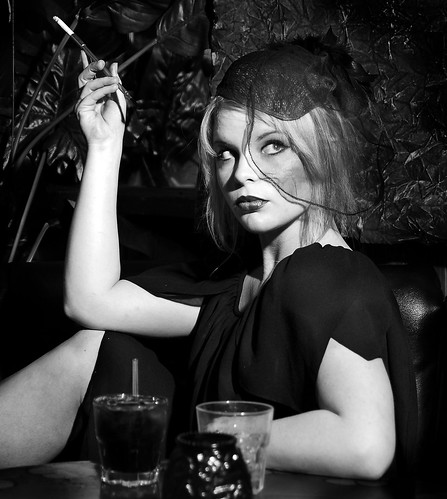
For this location shot I used a very simple one light set-up. Setting up a single SB-600 on a light stand at camera right about 6 feet from the model was all that it took to light this shot. I triggered the SB-600 using the built-in flash of the D200. The built-in flash was set to add no exposure while the SB-600 was set to TTL with an Exposure Compensation of +1EV.
Film noir is a very simple yet effective technique that can give your portraits a dramatic edge to them. For inspiration check out some of the great films of John Huston (The Maltese Falcon, The Asphalt Jungle) and Robert Siodmak (The Killers, Phantom Lady) . Alfred Hitchcock (Notorious) and Orson Welles (Lady from Shanghai) also dabbled in film noir. For old Hollywood style "noir" type portraits check out the work of George Hurrell.
5 comments:
Interesting post. I hope maybe in the future you might show a few pictures of a set up and then end result....
I'll keep that in mind...
Thanks for the advice.
I love your first photograph. The rim/side light is slightly overexposed and gives you a dramatic edge and lights that smoke from the cigarette beautifully. And that fill from the reflector gives you just the right amount of detail in your eyes but still maintaining the overall high contrast. Every time I have taken portraits in noir style I always tended to dump the fill light completely. Next time I'll add a reflector for sure!
Thanks Fred, I appreciate the feedback.
A little fill goes a long way!
Hi, 'Film Noir' is so much fun. I recently did a few shots of my son that look thematically much like your first shot. I'm going to try out some of your suggested light tips.
Post a Comment