Yes, I know this is primarily a photography blog. I also have other interests as some of you might know, and playing guitar is one of them. Don't fret, there will be a photography lesson after the amp review.
I'm a big fan of vintage guitars and amplifiers, Fender and Gretsch in particular. With the recent purchase of my big orange Gretsch 5120 I decided it needed to be paired up with a Gretsch amp to get the ultimate tone from the twang-machine. It sounded pretty good, but it sounds really good through my '65 Fender Twin Reverb.
Today I was taking a break and trying to learn (successfully) Howlin' Wolf's I Asked Her for Water. I was playing my Les Paul and it sounded pretty sweet, but the ground wire was loose on the Les Paul and it was buzzing like crazy so I grabbed up my Tele. Damn! That amp made that guitar growl and sing like I never heard before.
Now, everybody knows that a Telecaster through a Twin Reverb is the ultimate in guitar tone (right next to the Les Paul through a Marshall). This little amp created some sweet tones and I was so blown away that I decided to do a review.
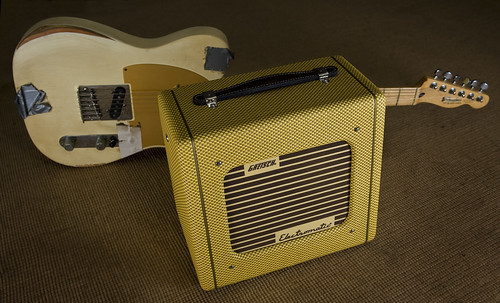
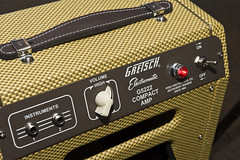
The Gretsch G5222 Electromatic guitar amp is just a little thing. Maybe 12 inches high and wide at the most. It pumps 5 watts of pure tube tone through a special design 6" inch speaker. Yep, you heard right. This is an actual tube amp powered by a 6V6 with a 12AX7 for the pre-amp.
This classic design is pure Fender (the Fender Champion 600 shares nearly the same circuitry) so it's no wonder this amp sounds so good. The controls are simple, one knob. That's right, one knob that controls the volume. There are 2 inputs, one a high gain for those growly dirty blues tones and the other for clean tones, although when the amp is cranked you can get some growl out of this channel too. To control the tone you use the tone controls on the guitar.
Usually on my guitars I just leave the tone knob up all the way. With the Tele's 3 position switch set to the neck pickup the tones were muddy, not good at all. Switched to the middle position with both pickups working it sounded great, some good growly low end with a nice bright highs mixed in.
Set to the bridge pickup it was awesome. Every Tele picker knows that this is where the twang comes from. It was sparkly, spanky, and growly all at once. It was sounding a little too brittle at times so I backed off the tone knob about 1/4 of a turn and there it was. The sweet spot. It sounded like I've always wanted my tele to sound. Pure heavenly tone. If this amp had an Accutronics spring reverb to add a little sparkle this amp would be the Holy Grail.
Of course, being only 5 watts this amp isn't going to be showing up on any stages, but for practice or quiet jam sessions this amp will rock. Where this amp will really shine is the recording studio. Mic this thing up for the ultimate tone. At less than $200 this amp is worth every penny ($195 MSRP). I found mine on ebay for $129.
I highly recommend this amp for any Tele player who wants great tone in a small package for little money.
Now for the photography part. How I lit the shot:
First off, I knew that I wanted some directional yet soft lighting. I grabbed an SB-900 I placed it in a Photoflex shoe mount bracket and attached it to a small 3X3 softbox. This is the Main light. Smaller softboxes allow you to get a diffused light source, but still give you some directionality. Initially I placed the light source on a light stand and angled it down, but I was getting a shadow from the guitar neck that I didn't like. I lowered the stand so that the softbox was on the same level as the amp. I was still getting a shadow. I the removed the softbox from the stand and set it on the floor. The natural position of the softbox was angled up so I gave it a shot. Perfect. It lit up the face of the amp nicely.
With only the Main light in place the amp was casting a shadow over the guitar body. Obviously, some fill was needed. I didn't want the fill to create any shadows or to add too much light to the scene. I just wanted to fill in the shadow while not lighting it too much to keep the dimensionality that the shadow area creates. I grabbed a piece of white foam core and faced it into the shadow area. I then aimed an SB-800 at the foam core to bounce the light to make it very diffused.
Everything was looking pretty good, except that the top of the amp was too dark as was the top edge of the guitar. I grabbed an SB-600 placed it on light stand and raised it about 3 feet above the amp's height. I pointed the flash head straight up and bounced the light from the ceiling for a nice diffused fill.
All of this was done using the Nikon Creative Lighting System's Advanced Wireless Lighting feature. I used an SU-800 to command the three Speedlights. The SB-900 Main light was set to Group A - TTL. This setting is a no brainer for getting a great exposure from your main light without doing any calculations.
The SB-800 used for the Fill light was a little more tricky. I set the SB-800 to Group B - TTL, but the exosure was too much. Even setting the Flash Exposure Compensation(FEC) to -3EV was still resulting in an overly bright image. I switched Group B on the SU-800 to Manual mode 1/8. This was the perfect amount of light to fill the shadows, but still keep the area low key.
The SB-600 was set to Group C - TTL. The exposure was spot on, but it was taking away too much of the shadows on the top of the amp and along with the shadows went the dimension. The image was looking flat. From the SU-800 I set the FEC to -1EV and there it was the perfect balance of highlight and shadow.
I love the simplicity and ease with which I can control the output of my flashes without touching a Speedlight. The Nikon Creative Lighting System is awesome. It makes my life a whole lot easier.
No comments:
Post a Comment