For most subjects this is true. Backlighting usually isn't the ideal shooting scenario. With backlighting you run the risk introducing lens flare and reduced contrast, but if you're willing to spend a little extra time composing your images and choosing the right settings backlighting can add creativity and drama to your images.
Shooting subjects that are backlit requires a different approach to metering and composition. Some photographers consider shooting with backlight one of the more difficult or advanced techniques in photography, but it doesn't really need to be so. A few simple guidelines are all you need to get started and with some practice you'll find that you will become quite adept at knowing which settings to use or how much exposure compensation to apply to get a specific effect.
Simply put, if the light source is behind the subject then the subject is backlit. What this means to a photographer is that the background will be exposed correctly, but the subject will be too dark. One of the easiest ways to remedy this situation is to use fill-flash. That will ensure that the subject and the background are both properly exposed resulting in a nice picture. I'm not going to cover that here because the point of this article is to think outside of the box to create interesting and dramatic images as opposed to your run of the mill photo.
The most important thing you can know about photographing backlit subjects is SPOT METER! That's right. Spot metering will tell you where you need your exposure needs to be. The only thing you need to do is point the spot meter in the right direction depending on the effect you after.
Portraits
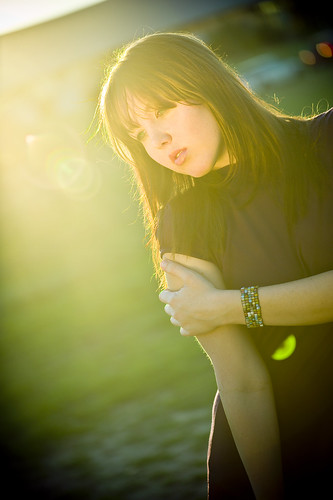
Using backlighting in a portrait can really make the subject (and your images) stand out. For this first example I simply spot metered on the model Toni's face. This allows her face to be perfectly exposed which is the most important part of the portrait. Sure the background gets a bit blown out, but the background isn't important in an image like this.

What the backlighting does is provide a halo of light around the models head which provides a good separation from the background. In studio portraiture this would be called a hair light, a rimlight, or sometimes it's called a kicker.
For this next example I pretty much shot the same way, metering on the face, except that I allowed the sun into the frame to introduce more lens flare into the image. A lot of photographers concentrate on keeping lens flare out of their shots, but as you can see lens flare can add an interesting effect to the shot. Lens flare is caused by the light reflecting and bouncing around the glass elements of the lens.
Silhouettes
One of the most popular ways to incorporate backlighting into photography is the silhouette. This type of shot is epitomized by a bright well exposed background where the subject is completely in shadow, often with no shadow detail in the image at all.
While you can do silhouettes when shooting portraits most often this type of image is seen in landscapes.
As with backlit portraits when shooting a silhouette spot metering is the key. The main difference is where you meter. Since the subject is to fall into shadow you will want to meter on the brightest spot in the background. This gives the background nice saturated colors and allows the subject to stand out against the background by being underexposed or even completely black as in the image of the Huntington Beach Pier at sunset below.
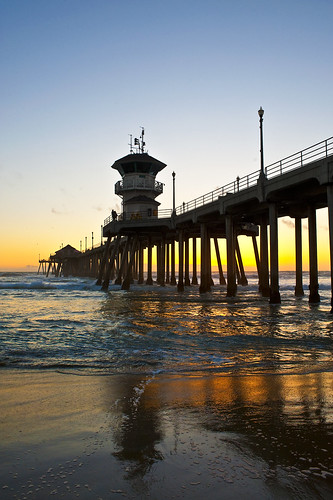
Another tip for shooting landscape silhouettes is to use a small aperture to ensure both the foreground and background are in focus. A poorly focused silhouette is very noticeable.
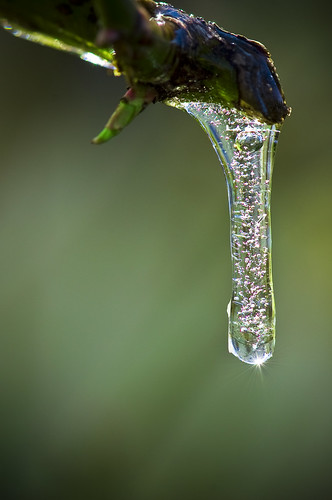
Translucence
Backlighting is also very useful when shooting translucent subjects such as flowers, plant leaves, or ice. Backlighting allows translucent materials to glow and it's also great for highlighting details in a translucent subject as you can see of this photo of the ice drop. The strong backlight highlights all of the tiny bubbles trapped in the ice as well as providing a rimlight for the subject which allows it to pop from the relatively dark background. This type of subject is the exception to the spot meter rule and generally works best using center-weighted metering.
These are just a few hints on how you can use backlighting to make your images more interesting. You can be conservative in your use of it or you can push the envelope. Sometimes I like to allow the background to almost completely blow out (my photo professors would have really frowned upon this). I like the way the blown out background allows the model to stand out and the decreased contrast gives the image an ethereal look. The bottom line is the choice is yours, break some rules and break out of the box!
1 comment:
Thanks, very helpful.
Post a Comment